世の中にはいろいろなサービスの情報を取得できる便利なAPIが溢れています。
僕は個人的にオンラインFPSであるAPEX Legendsをよくやってまして、今回はゲーム内マップの切り替わりをApex Legends APIを使ってWEB上で確認できる簡単なツールを作成してみました。
現在のマップローテーションを確認したい方は以下のURLから確認できます!
https://neightbor.net/labo/apex-map/
Apex Legends APIについて
本題に入る前に今回利用するApex Legends APIについて紹介したいと思います。
Apex Legends APIは非公式のAPIでありますが、「プレイヤー情報」「試合履歴情報」「マップローテーション情報」「クラフトローテーション情報」などのゲーム内情報を取得することができるめっちゃ便利なAPIです。
Discordを使えば時間あたりのリクエスト数をグレードアップできるのですが、通常であれば2秒に1回のリクエストに制限されています。
準備1: APIキーの発行
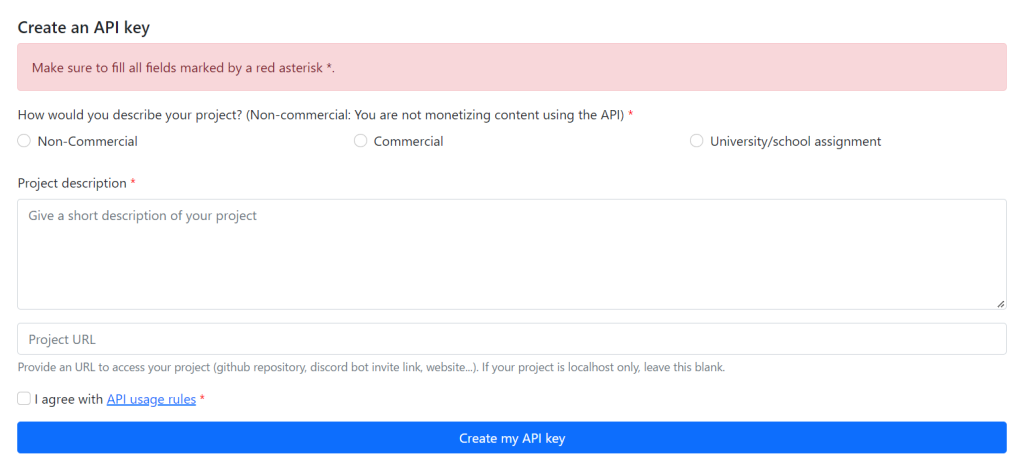
Apex Legends APIの利用には、APIキーが必要になります。
APIキーは以下の簡単なフォームの入力だけですぐに発行できます。


準備2: エンドポイントの確認
APIの利用はとても簡単です。

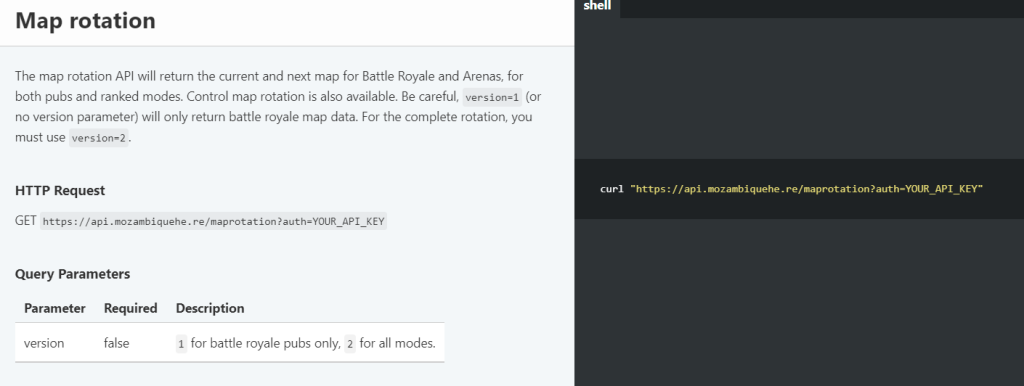
取得したい情報ごとにリクエスト先となるエンドポイントが用意されています。
このURLに対してAPIキーを持たせてGETでリクエストすることで、以下のようなレスポンスを受け取ることができます。

マップローテーションの情報は、カジュアルマップについて現在のマップと次のマップ情報を取得することができます。
アリーナのマップローテーションを取得する場合は、リクエストのパラメータに「version=2」を追加してあげることですべてのマップローテーション情報を取得することができますが、今回はカジュアルの方だけあればいいのでversionは指定しません。
プログラムを作っていく
さて本題のプログラム部分を作っていこうと思います。
今回は細かなデータ操作が必要なので、Vue.jsを使ってプログラムを組んでいきます。
ファイル構造

index.html
<!DOCTYPE html>
<html lang="ja">
<head>
    <meta charset="UTF-8">
    <meta http-equiv="X-UA-Compatible" content="IE=edge">
    <meta name="viewport" content="width=device-width, initial-scale=1.0">
    <title>APEX Map rotation</title>

    <!-- font -->
    <link rel="preconnect" href="https://fonts.googleapis.com">
<link rel="preconnect" href="https://fonts.gstatic.com" crossorigin>
<link href="https://fonts.googleapis.com/css2?family=Noto+Sans+JP:wght@400;500;700;900&family=Overpass&display=swap" rel="stylesheet">

    <!-- css -->
    <link rel="stylesheet" href="./assets/style.css">

    <!-- js -->
    <script src="https://unpkg.com/vue@next"></script>
    <script src="https://cdn.jsdelivr.net/npm/axios/dist/axios.min.js"></script>
    <script src="https://cdnjs.cloudflare.com/ajax/libs/moment.js/2.29.4/moment.min.js"></script>

</head>
<body>
    <div id="app">
        <header>
            <h1>{{ product }}</h1>
        </header>

        <!-- マップローテーション表示エリア -->
        <section id="map-rotation-datas">
            <div class="main-map">
                <!-- 現在のマップ -->
                <div id="current-map-datas" class="map-data" :style="{ background: 'url(' + mapImagesUrl[currentMap.code] + ')' }">
                    <div class="period">
                        <span class="start">{{ unixToTime(currentMap.start) }}</span>~<span class="end">{{ unixToTime(currentMap.end) }}</span>
                    </div>
                    <div class="map-name">{{ currentMap.map }}</div>
                    <div class="remain-time">残り時間:<span>{{ currentMap.remainingTimer }}</span></div>
                </div>
            </div>

            <div class="sub-map">
                <!-- 次のマップ -->
                <div id="next-map-datas" class="map-data" :style="{ background: 'url(' + mapImagesUrl[nextMap.code] + ')' }">
                    <div class="period">
                        <span class="start">{{ unixToTime(nextMap.start) }}</span>~<span class="end">{{ unixToTime(nextMap.end) }}</span>
                    </div>
                    <div class="map-name">{{ nextMap.map }}</div>
                </div>

                <!-- 次の次のマップ -->
                <div id="other-map-datas" class="map-data" :style="{ background: 'url(' + mapImagesUrl[otherMap.code] + ')' }">
                    <div class="period">
                        <span class="start">{{ unixToTime(otherMap.start) }}</span>~
                    </div>
                    <div class="map-name">{{ otherMap.map }}</div>
                </div>
            </div>

        </section>
    </div>

    <!-- Import JS -->
    <script src="./main.js"></script>

    <!-- Mount App -->
    <script>
        const mountedApp = app.mount('#app')
    </script>
</body>
</html>
main.js
const requestUrl = 'https://api.mozambiquehe.re/maprotation?auth='
const apikey = '~~~~~~~~~~~~~'

const app = Vue.createApp({
    data() {
        return {
            product: 'APEX Map Rotation',
            apikey: apikey,
            currentMap: [],
            nextMap: [],
            otherMap: [],
            mapImagesUrl: {
                'olympus_rotation': 'https://apexlegendsstatus.com/assets/maps/Olympus.png',
                'worlds_edge_rotation': 'https://apexlegendsstatus.com/assets/maps/Worlds_Edge.png',
                'broken_moon_rotation': 'https://apexlegendsstatus.com/assets/maps/Broken_Moon.png'
            }
        }
    },

    /* mounted */
    mounted() {
        // マップローテーション取得
        this.getMapRotation()
    },

    /* methods */
    methods: {
        // getMapRotation
        getMapRotation() {
            axios.get(requestUrl + apikey)
            .then(res => {
                // 現在のマップ情報をセット
                this.currentMap = res.data.current

                // 次のマップ情報をセット
                this.nextMap = res.data.next

                // 次の次のマップ情報をセット
                this.setOtherMap()

                // カウントダウンタイマー開始
                this.countDowntimer(this.currentMap.remainingSecs)
            })
            .catch(err => {
                console.log(err)
            })
        },

        // setOtherMap
        setOtherMap() {
            // 終了時刻
            let otherStartTime = new Date(this.nextMap.end * 1000);
            let ts = otherStartTime.getTime();

            // 一時間後
            let otherEndTime = new Date(ts + (1000 * 60 * 60));
            let endUnixTime = Math.floor(otherEndTime.getTime() / 1000);

            if(this.currentMap.code != 'olympus_rotation' && this.nextMap.code != 'olympus_rotation') {
                // otherMapはオリンパス
                this.otherMap = {
                    'code': 'olympus_rotation',
                    'map': 'Olympus',
                    'start': this.nextMap.end,
                    'end': endUnixTime
                }

            } else if(this.currentMap.code != 'worlds_edge_rotation' && this.nextMap.code != 'worlds_edge_rotation') {
                // otherMapsはエッジ
                this.otherMap = {
                    'code': 'worlds_edge_rotation',
                    'map': `World's Edge`,
                    'start': this.nextMap.end,
                    'end': endUnixTime
                }

            } else if(this.currentMap.code != 'broken_moon_rotation' && this.nextMap.code != 'broken_moon_rotation') {
                // otherMapsはブロークンムーン
                this.otherMap = {
                    'code': 'broken_moon_rotation',
                    'map': 'Broken Moon',
                    'start': this.nextMap.end,
                    'end': endUnixTime
                }
            }
        },

        // countDownTimer
        countDowntimer(sec) {
            let me = this

            setInterval(function(){
                let hour = me.toDoubleDigits(Math.floor(sec % 86400 / 3600))
                let min = me.toDoubleDigits(Math.floor(sec % 3600 / 60))
                let rem = me.toDoubleDigits(sec % 60)

                // 表示残り時間上書き
                me.currentMap.remainingTimer = `${hour}:${min}:${rem}`

                // 残り秒数減算
                sec--

                // 残り秒数が0ならデータを再取得する
                if(sec == 0) {
                    me.getMapRotation()
                }
            }, 1000)
        },

        // toDoubleDigits
        toDoubleDigits(num) {
            // 0詰めする関数
            num += "";
                if (num.length === 1) {
                    num = "0" + num;
                }
            return num;
        }
    }
})
プログラムの全容は上記の通りになります。
簡単に処理の流れを解説していきます。
処理1: マップローテーション情報の取得
        // getMapRotation
        getMapRotation() {
            axios.get(requestUrl + apikey)
            .then(res => {
                // 現在のマップ情報をセット
                this.currentMap = res.data.current

                console.log(this.currentMap)

                // 次のマップ情報をセット
                this.nextMap = res.data.next

                // 次の次のマップ情報をセット
                this.setOtherMap()

                // カウントダウンタイマー開始
                this.countDowntimer(this.currentMap.remainingSecs)
            })
            .catch(err => {
                console.log(err)
            })
        },
APIを利用し、マップローテーション情報を取得しているのは上記のgetMapRotation関数です。
APIを利用して取得したデータを、「現在のマップ」「次のマップ」用のオブジェクトへと格納しています。
そしてオリジナルの追加要素として、「次の次のマップ」をsetOtherMap関数を利用して取得するようにしています。
処理2: 次の次のマップを情報を取得する
Apex Legends APIでは「現在のマップ」と「次のマップ」の2マップの情報しか取得することができません。
ただ、シーズン15のマップローテーションは3マップでローテーションされていますので、せっかくなら3つ目のマップ情報も表示したいところです。
そこで3つ目のマップ情報を表示するための関数を用意しました。
        // setOtherMap
        setOtherMap() {
            // 終了時刻
            let otherStartTime = new Date(this.nextMap.end * 1000);
            let ts = otherStartTime.getTime();

            // 一時間後
            let otherEndTime = new Date(ts + (1000 * 60 * 60));
            let endUnixTime = Math.floor(otherEndTime.getTime() / 1000);

            if(this.currentMap.code != 'olympus_rotation' && this.nextMap.code != 'olympus_rotation') {
                // otherMapはオリンパス
                this.otherMap = {
                    'code': 'olympus_rotation',
                    'map': 'Olympus',
                    'start': this.nextMap.end,
                    'end': endUnixTime
                }

            } else if(this.currentMap.code != 'worlds_edge_rotation' && this.nextMap.code != 'worlds_edge_rotation') {
                // otherMapsはエッジ
                this.otherMap = {
                    'code': 'worlds_edge_rotation',
                    'map': `World's Edge`,
                    'start': this.nextMap.end,
                    'end': endUnixTime
                }

            } else if(this.currentMap.code != 'broken_moon_rotation' && this.nextMap.code != 'broken_moon_rotation') {
                // otherMapsはブロークンムーン
                this.otherMap = {
                    'code': 'broken_moon_rotation',
                    'map': 'Broken Moon',
                    'start': this.nextMap.end,
                    'end': endUnixTime
                }
            }
        },
setOtherMap関数は、先に取得したcurrentMapとnextMapの情報をもとにそれ以外のマップを「次の次のマップ情報」としてオブジェクトに定義するための関数です。
処理3: マップ情報を画面に表示
        <!-- マップローテーション表示エリア -->
        <section id="map-rotation-datas">
            <div class="main-map">
                <!-- 現在のマップ -->
                <div id="current-map-datas" class="map-data" :style="{ background: 'url(' + mapImagesUrl[currentMap.code] + ')' }">
                    <div class="period">
                        <span class="start">{{ unixToTime(currentMap.start) }}</span>~<span class="end">{{ unixToTime(currentMap.end) }}</span>
                    </div>
                    <div class="map-name">{{ currentMap.map }}</div>
                    <div class="remain-time">残り時間:<span>{{ currentMap.remainingTimer }}</span></div>
                </div>
            </div>

            <div class="sub-map">
                <!-- 次のマップ -->
                <div id="next-map-datas" class="map-data" :style="{ background: 'url(' + mapImagesUrl[nextMap.code] + ')' }">
                    <div class="period">
                        <span class="start">{{ unixToTime(nextMap.start) }}</span>~<span class="end">{{ unixToTime(nextMap.end) }}</span>
                    </div>
                    <div class="map-name">{{ nextMap.map }}</div>
                </div>

                <!-- 次の次のマップ -->
                <div id="other-map-datas" class="map-data" :style="{ background: 'url(' + mapImagesUrl[otherMap.code] + ')' }">
                    <div class="period">
                        <span class="start">{{ unixToTime(otherMap.start) }}</span>~
                    </div>
                    <div class="map-name">{{ otherMap.map }}</div>
                </div>
            </div>

        </section>
基本的な情報を取得出来たらブラウザへと表示します。
上記のように、「現在のマップ」をメインマップとして、「次のマップ」と「次の次のマップ」をサブマップとして表示するようにしました。
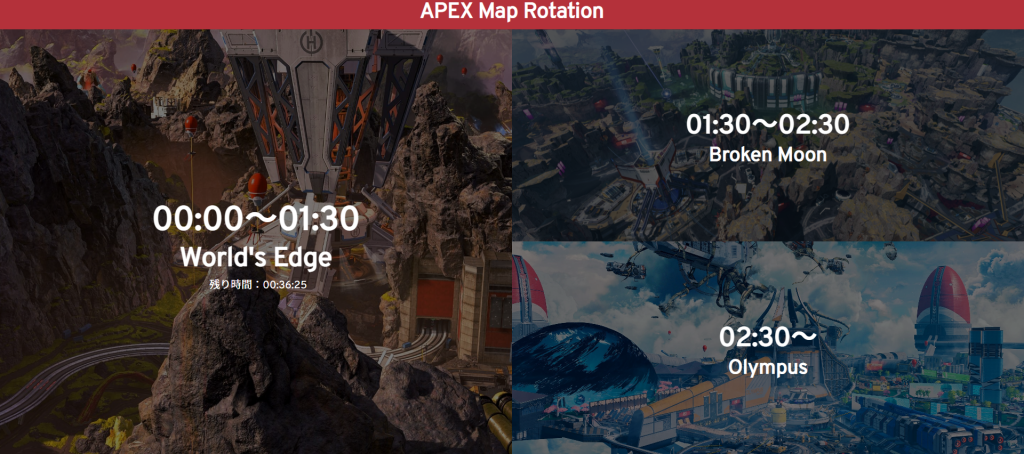
実際に描画した結果以下のような画面になります。

左の大きい画面が「現在のマップ」で右上が「次のマップ」、右下が「次の次のマップ」になります。
処理4: 残り時間のカウントダウンタイマーの実装
「現在のマップ」エリアには、残り時間を表示しています。

このカウントダウンタイマーを実装するにあたり、1秒ごとにリクエストをかけデータを再取得する方法も考えられるのですが、APIの制限上2秒に1リクエストしかできないため、ページ読み込み時に取得したデータにある「remainingSecs」を利用し、カウントダウンタイマーを自作します。
        // countDownTimer
        countDowntimer(sec) {
            let me = this

            setInterval(function(){
                let hour = me.toDoubleDigits(Math.floor(sec % 86400 / 3600))
                let min = me.toDoubleDigits(Math.floor(sec % 3600 / 60))
                let rem = me.toDoubleDigits(sec % 60)

                // 表示残り時間上書き
                me.currentMap.remainingTimer = `${hour}:${min}:${rem}`

                // 残り秒数減算
                sec--

                // 残り秒数が0ならデータを再取得する
                if(sec == 0) {
                    me.getMapRotation()
                }
            }, 1000)
        },

        // toDoubleDigits
        toDoubleDigits(num) {
            // 0詰めする関数
            num += "";
                if (num.length === 1) {
                    num = "0" + num;
                }
            return num;
        }
countDownTimer関数の引数にcurrentMap.remainingSecsの値を渡して処理を実行させています。
countDownTimerが実行されると、1秒に1回受け取ったcurrentMap.remainingSecsの値を-1秒し、「時:分:秒」の形式に変換し、currentMap.remainingTimerに上書きすることでリアルタイムに残り時間をカウントダウンさせています。
ちなみにtoDoubleDigits関数を使うことで時間の表示を0詰めの2桁に矯正しています。
まとめ
ということで、今回はApex Legends APIを利用してリアルタイムにマップローテーション情報を取得するツールを作成してみました。
非公式のAPIでありながらも、ゲーム内情報をリアルタイムかつ簡単に取得できるのは本当に驚きました。
今回作ったツールは以下のURLからアクセスできますので、APEXプレイヤーのみなさん是非使ってみてください。
